そうだルーターも仮想化しよう
VyOSについて調べていると、Vyattaコマンドのものが多くてNATについてもなかなかまとまったものがなく。情報収集で数日かかった。以下、インストールのところから操作を順番に覚え書きメモ。インストールしたものは、vyos-1.1.6-amd64.iso。ディスク容量3GB、メモリー量512MBで仮想マシン構築。
断片的情報ではなく、これでインストールから繋がる、サーバー公開できる、という自己メモ。
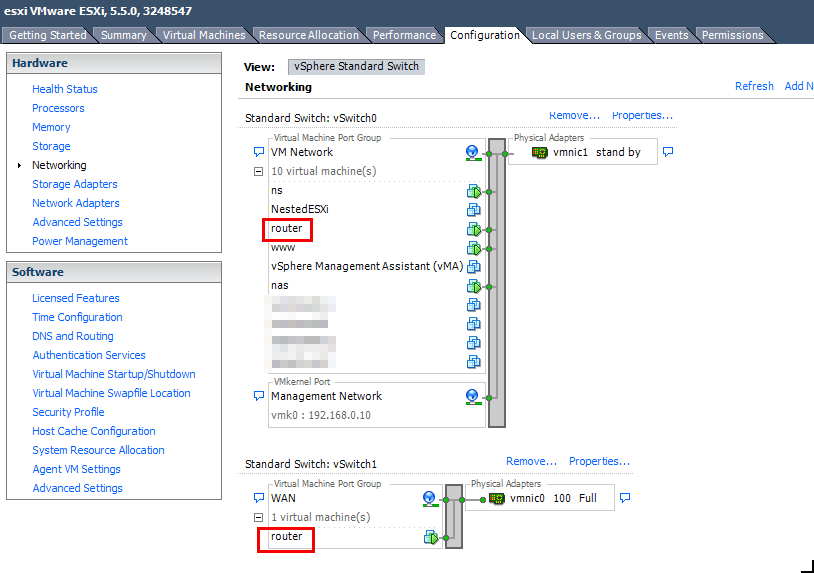
VyOS全設定
vyos@vyos:~$ install image
vyos@vyos:~$ reboot
vyos@vyos:~$ show system image
The system currently has the following image(s) installed:

 1: 1.1.6 (default boot)

vyos@vyos:~$ configure
vyos@vyos:~# set service ssh port 22
vyos@vyos:~# set interfaces ethernet eth1 address 192.168.0.1/24
vyos@vyos:~# commit
vyos@vyos:~# save

~TeraTermでログイン~

・NW構成
eth0 OUTSIDE-IN(OUTSIDE)ISPにPPPoE
eth1 LAN(INSIDE)、192.168.0.1/24
-------------------------------------------

・新しいユーザー追加、vyosユーザー削除
$ configure
set system login user [user]
set system login user [user] authentication plaintext-password [pw]
set system login user [user] level admin
commit
save
exit
exit

$ configure
delete system login user vyos


・ログインし直して設定再開
set interfaces ethernet eth0 description OUTSIDE
set interfaces ethernet eth1 description INSIDE

delete system ntp server 0.pool.ntp.org
delete system ntp server 1.pool.ntp.org
delete system ntp server 2.pool.ntp.org
set system ntp server ntp.nict.jp
set system time-zone Asia/Tokyo

・ISPにPPPoE(local-address は固定IPアドレス持っている場合)
set interface ethernet eth0 pppoe 0
set interface ethernet eth0 pppoe 0 user-id xxxx@example.jp
set interface ethernet eth0 pppoe 0 password xxxxxxxx
set interface ethernet eth0 pppoe 0 name-server auto
set interface ethernet eth0 pppoe 0 defaultroute auto
set interface ethernet eth0 pppoe 0 local-address xxx.xx.xx.xxx
set interface ethernet eth0 pppoe 0 mtu 1454
commit

set nat source rule 100 outbound-interface pppoe0
set nat source rule 100 source address 192.168.0.0/24
set nat source rule 100 translation address masquerade
set policy route flets rule 100 protocol tcp
set policy route flets rule 100 set tcp-mss 1414
set policy route flets rule 100 tcp flags SYN
set interfaces ethernet eth1 policy route flets
commit

run show interfaces pppoe
run show int

・DHCP設定
set service dhcp-server disabled false
set service dhcp-server shared-network-name LAN subnet 192.168.0.0/24 default-router 192.168.0.1
set service dhcp-server shared-network-name LAN subnet 192.168.0.0/24 start 192.168.0.100 stop 192.168.0.200
set service dhcp-server shared-network-name LAN subnet 192.168.0.0/24 dns-server '0.0.0.0'
commit

set service dns forwarding cache-size 0
set service dns forwarding listen-on eth1
set service dns forwarding name-server 8.8.8.8
set service dns forwarding name-server 8.8.4.4
commit

・公開サーバー向け
set nat destination rule 10 inbound-interface pppoe0
set nat destination rule 10 destination port 80,443
set nat destination rule 10 protocol tcp
set nat destination rule 10 translation address 192.168.0.52
set rule 10 translation port 80,443

set nat destination rule 15 inbound-interface pppoe0
set nat destination rule 15 destination port 53
set nat destination rule 15 protocol tcp_udp
set nat destination rule 15 translation address 192.168.0.51
set rule 15 translation port 53
commit
save

・VPN(L2TP)追加
set vpn ipsec ipsec-interfaces interface pppoe0
set vpn ipsec nat-traversal enable
set vpn ipsec nat-networks allowed-network 0.0.0.0/0
set vpn l2tp remote-access outside-address グローバルIPアドレス
set vpn l2tp remote-access ipsec-settings authentication mode pre-shared-secret
set vpn l2tp remote-access ipsec-settings authentication pre-shared-secret 適当な認証キー文字列
set vpn l2tp remote-access ipsec-settings ike-lifetiime 7200
set vpn l2tp remote-access mtu 1280
set vpn l2tp remote-access client-ip-pool start DHCP開始アドレス
set vpn l2tp remote-access client-ip-pool stop DHCP終了アドレス
set vpn l2tp remote-access dns-servers server-1 DNSサーバーアドレス
set vpn l2tp remote-access authentication local-users username VPN接続用ユーザー
set vpn l2tp remote-access authentication local-users username VPN接続ユーザー password パスワード
set vpn l2tp remote-access authentication mode local
commit
save

・設定確認
run show configuration

※ 特定行設定削除は、行頭のset をdelete に置き換える

・rootのパスワード設定もしておく
vyos:~$ sudo su -
root@vyos:~# passwd
Enter new UNIX password:
Retype new UNIX password:
passwd: password updated successfully
root@vyos:~#

※ほかファイアウォールも加える
スピード比較
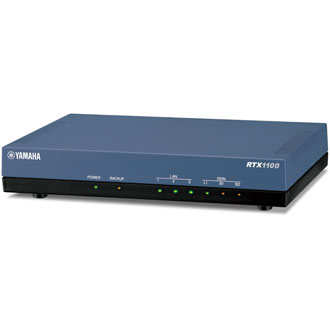
RTX1100での回線スピード
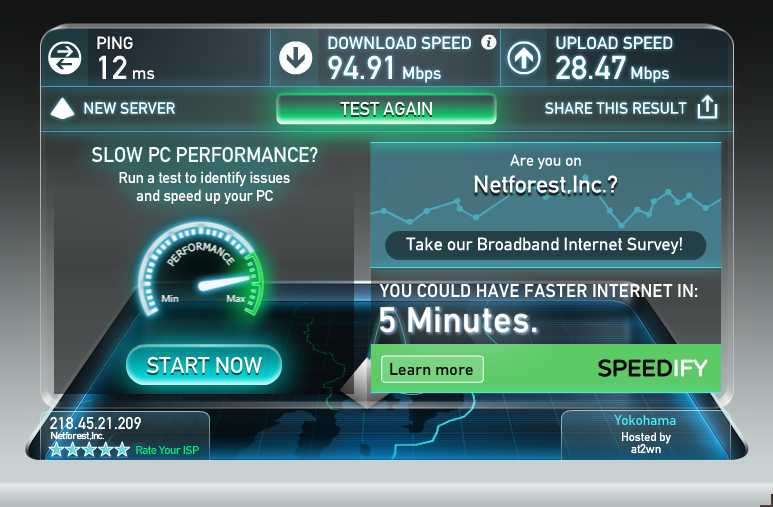
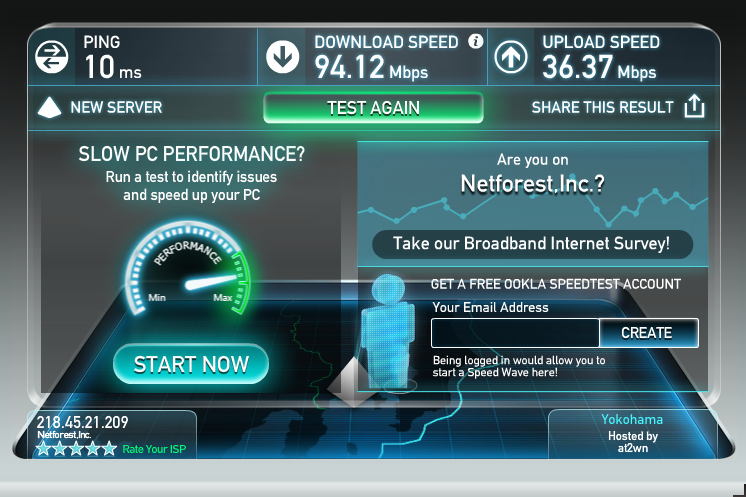
VyOSでの回線スピード

どうして遅くなった(;・∀・)。。。環境、Bフレッツ。
これで、RTX1200や適当なGbEルーター買わずに光ネクストギガへ乗り換えられる。
とうとうハードウェアルーターから決別したと思うと感慨深いw これまでに使ったモデルを振り返ってみた。。

長い年月でこれだけ、少なっ!(;・∀・)
追記:今日測ってみたら前と同じようなスピード出てた(・∀・) これでハードウェアルーターさようなら。。。
VyOSその後の回線スピード
追記:もう2年以上まったく問題なく24時間稼働してます。二度とハードには戻らない。。。